
Carron Spey
This lesson will be the most involved lesson so far, not because the Spey and Dee style flies are so difficult. It is involved due to the different materials in particular, the hackles that are used for these flies.
The Speys were introduced in the 1800’s for fishing the River Spey In Scotland. The Dees were introduced on the River Dee in Scotland.
Both styles are similar yet, different. The one big difference is in the wing style. The Spey typically sports a Bronze Mallard wing that sits low along the hook shank while the Dee wing is split and somewhat drooping along the hook shank and, is generally of Turkey.
Both were dressed with Heron, Eagle and other long soft barbed hackles. One of these hackles were the side feathers on a Rooster’s tail. The first two hackles are now illegal and the third is somewhat scarce. Good substitutes are available though although some come with a price. Blue Eared Pheasant is now widely used as a Heron substitute and, makes very good hackles although the feathers are somewhat short and have a “fast taper” (more on this later). By that I mean the feather rachis or, shaft, is somewhat fine near the tip but, becomes fairly large towards the middle of the feather. Many of the feathers that are used for Spey hackles come from various breeds of Pheasants and they tend to share the shaft characteristics. Schlappen is widely used for hackle and, usually has fine shafts.
The flies below are all the same pattern (The Carron) but, were tied with a variety of different hackles to show the differences.
The fly with the dun Rooster tail hackle has much shorter barbs than most of the others so, to make it provide a similar profile as the long hackled flies, I started the hackle at the rear of the fly. The others are started at the fourth rib which is specified in TE Pryce-Tannatt’s book and several other old references that I’ve seen.
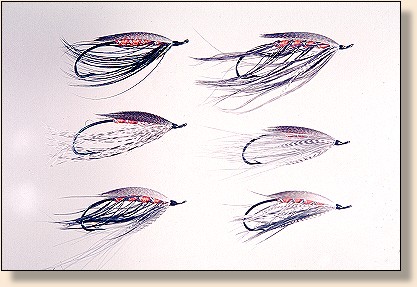
One other option for instances when you want a long trailing hackle but, you only have fairly short ones available is to tie on a few long fibers beard style. The fly with the black hackle and the long grey beard is done this way.
My point in showing you all of these flies is to demonstrate that there is always more than one way to achieve the same or, similar end result. Try to “think outside the box” when you tie. When you need a particular material to do a particular thing, take stock of your available materials and think of using them in different ways. You will hear this bit of advise frequently throughout the upcoming lessons.
When selecting the bronze Mallard for your Spey wings, select feathers that match perfectly in every way. The barbs can be a little different length but, their curves must match. Also, select feathers with good web out to the tips. If you use feathers with wispy ends that don’t marry (cling to each other) at the tips, it can cause problems tying them on. In use fishing though, it isn’t too important. Really good Mallard can be difficult to find but, when you find some, get it.
I have chosen two very old patterns for this lesson. The Spey Fly is called the Carron and, the Dee is the Dunt. The Carron has the typical Bronze Mallard wing, a wool yarn body and some involved ribbing. The Dunt has the typical Turkey Dee wings and, a dubbed tricolor body. While you may not fish either of these patterns, once you learn to tie them, you can adapt the techniques to any of these styles to meet your local needs. The Dunt will appear as the next step-by-step lesson.
So, let’s get started on the Carron.
Carron
Hook: Partridge CS10/1.
Thread: Black.
Body: Orange Berlin Wool (If you can’t find Berlin Wool, use most any yarn).
Rib: Flat silver UNI-Tinsel and red UNI-Floss counter ribbed with silver oval UNI-Tinsel.
Hackle: Original calls for Heron so, we must substitute. I used a natural Spey Hackle (A feather that I process) that has been stripped from the quill.
Wing: Bronze Mallard (You can use many other feathers for wings on Speys. Peacock secondaries make good wings as do others.)
Collar: Teal, one turn.
Head: Black.
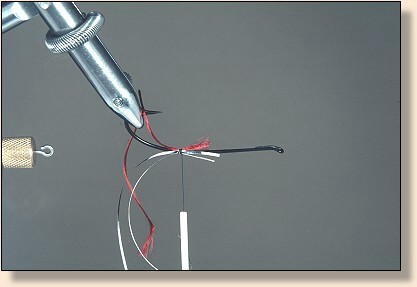
1.The ribbing has been attached to the rear of the hook at about 1:00 and, 5:00 if you think of the hook shank as a clock face. By doing this, when you wrap the ribs, they will come forward some to about 12:00 and, 6:00 respectively. On a fly where you have two or more elements to a rib, you want to tie the trailing component at the 1:00 or 5:00 position as I have done here.
2.This is the front of the hook showing the ribbing.

3.Bind the tag ends of the ribs to the rear of the hook in close flat thread turns to the area shown and, attach the body yarn underneath the hook shank.
4.Wrap the yarn body in close turns to the rear and back to the fourth rib location and tie in the hackle by it’s tip on the bottom of the body with the yarn and, continue the yarn to the end of the body. Stay a good distance from the eye to give plenty of room for tying off all the materials and wing.
A note on ribbing: To estimate where a particular turn of a rib will be I often take a old piece of ribbing or thread and wrap it temporarily to see how the final rib will lay. You can use the actual rib but, repeated wrapping & unwrapping may cause the tinsel to come apart. For this reason, I prefer to make the actual tinsel to be used wrap once.
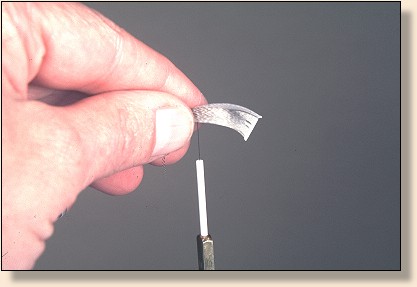
Here are some ways of preparing hackles for Salmon flies. One way is to “fold” the hackle, see Folded V Stripped feathers picture. The two pics show the process of folding a feather that is from How to Dress Salmon Flies by T E Pryce-Tannatt. Figure 1 shows how to hold the feather. Remember that a feathers barbs on the right side of the feather shaft will wrap the conventional clockwise direction. For this reason, you want to fold the barbs on the left side to the right under the shaft as in figure 30. Figure 31 shows the finished folded hackle. It sometimes helps to moisten your left thumb and index fingers to provide more friction when folding the hackle.
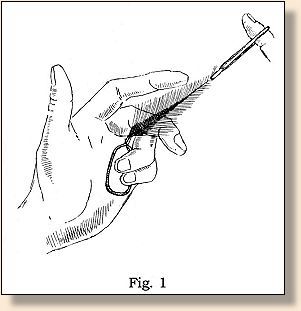
Figure 1

Another way to prepare a hackle is to simply strip the left barbs from the feather shaft. The folded hackle will of course have twice as many barbs than the one that is stripped so, it will be a much fuller fly.

I mentioned feathers with “fast” and “slow” tapers earlier. Most of the Pheasant feathers above have a “fast” taper to their shafts. This kind of feather limits the number of turns you can use it before the bulk of the shaft starts to make a difference in the bulk at the front of the fly. Other feathers like schlapen will allow many more turns before bulk makes a difference. The problem with schlapen and, many other feathers that are commonly used for Spey hackles is that many have pretty short barbs so, the fly won’t have those long flowing barbs to attract the fish’s attention.
One alternative are feathers from Peafowl. I started tying Speys with the typical “burned” Goose and hated it. The stuff is often brittle and, the shafts are large. I discovered some feathers in a bag of molted Peafowl feathers that a friend gave me one day. There were feathers with barb lengths up to 3″ long and, some of the feathers were 12″ to 14″ long! These are the feathers found on the rump of the Peahen and immature Peacocks. In the mature Peacocks, these are replaced by the eyed “tail” feathers. The problem was, they had quite bulky shafts on them. At first, I used the barbs tied in as beards. That was an ok solution but, not really the best. One day, it occurred to me that if I could remove the strip of barbs off the shaft, I would have something truly special. Later, after some mixed results, I developed a method for stripping the barbs off of just about any feather which makes hackles with virtually no bulk!
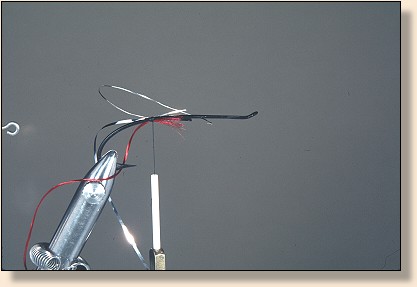
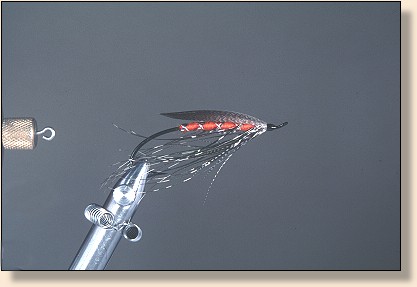
5. Wrap the tinsel rib first then the floss. Leave a slight space between them for the hackle to follow.

6. Wrap the hackle forward, tie off and, cut waste end.

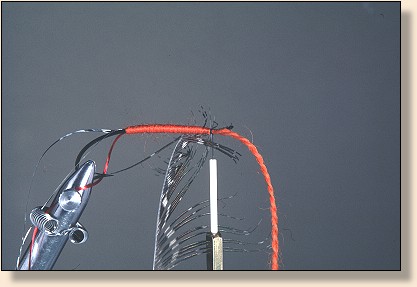
7. Wrap the counter rib. When going through the hackle with the rib, you need to move the barbs aside with your bodkin where the rib will lay so they aren’t trapped by the rib. Tie in the Teal by it’s tip on the far side of the hook, take one turn, tie off and, cut the waste end. I like my Spey wings to lay as close to the hook shank and parallel to it as possible. For that reason, I will usually either cut or pluck any hackle barbs that can’t be pulled down and back over the sides of the fly. If I am using a hackle that has been stripped from the shaft, I will cut rather than pluck the barbs since the feathers are fairly fragile until counter ribbed. The barbs will kick the wing up if not removed.
Spey Wings When selecting bronze Mallard for Spey wings, look for feathers that match exactly in every way. That means, every curve and compound curve must be the same. You can get by with slightly different barb length but, It’s best to have everything the same. Select also, feathers that have web as close to the barb tips as possible. You can use feathers that aren’t webby to the tips but, easier if they are. The bronze Mallard is the most common feather for winging Speys but, many other feathers can also be used to good effect.

B Strip the bad side of the feather and trash can it. Remove the base of the good side to where the tips of the barbs are married, see picture B (above). There is a “sweet spot” on bronze Mallard feathers and, anything on either side will not work for Spey wings. Separate out the width of one wing and stroke it down the opposite way that it grew. Hold that feather next to the other and separate out the same size and stroke it as well. Some guys just stroke the barbs a little bit, about 90 degrees to the rachis. I forcefully stroke it as far to the bottom of the rachis as possible, see picture C, below.
C
Picture D. (below) shows the matching curve of the wing slips. Now, cut both wing sections from the feather by cutting the rachis (feather shaft) not, the barbs. This bit of rachis will hold everything together better than if you just cut the barbs from the shaft. D

Once you have selected the feathers for your Spey wings, there are three ways to tie them in. The illustration shows these ways looking at the hook from the eye.
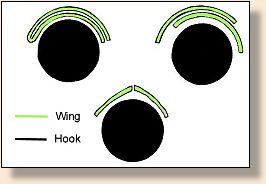
The three wing styles above are used for Spey Flies. The top two are easier than the bottom one and, perhaps more stable when fishing the fly.
The top right shows overlapping the two sections of the wing. This is probably the easiest method of winging a Spey. The top left shows one wide section of a feather that has been preened to 90 degrees from the feather quill and cut free then, folded in half and tied on the fly. The bottom example shows the method I prefer. This method takes a pair of sections a little narrower than the others and, holding them so the top edges meet without overlapping. This method results in a very good looking wing that will lay flat. It can also be the more difficult to execute.
When winging a Spey, do not let the wings come down over the sides of the fly. Also, flatten the area at the wing area and slightly to the rear of the fly with smooth face pliers so, you have a flat bed to tie the wing on. If you have dubbing or hackle barbs in that area, either cut or pluck the hackle and/or cut the dubbing flat. If these cause a bump there, it will kick the wing up. I strive to have my Spey wings lay as flat as possible and, to follow the curve of the hook. This is just a personal thing, do them however you like.
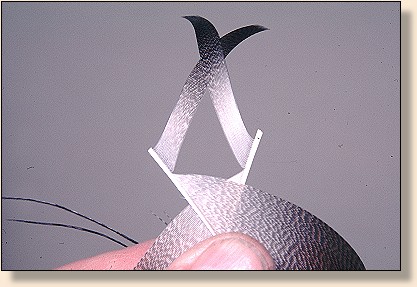
8. This is my preferred way of winging Speys. Ok, now place the two halves together with the now wrong way curves convex sides together and line up the tips as shown in picture C. I want the two edges of the sections to meet and somewhat marry with a seam down the middle of the finished wing. Tent this over the fly and while holding, take one soft loop of thread around the wing and hook with NO tension. Take a second turn with LIGHT tension directly in front of the first. From here, no turns behind the first or the wing will twist. You can now let go of the wing and look at the alignment. If it looks the way you like, take a third TIGHT turn. this turn will cinch up the first two and really anchor the wing. It must be just about at the thread breaking point.

9. Take one or two more tight turns, lift the butts of the wing while holding tension on the thread, and, cut them off a little at a time. Sometimes if you try cutting the whole thing, the wing can move. Now, you can place a little head cement on the butts and whip finish.
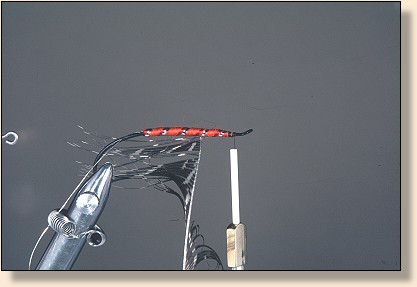
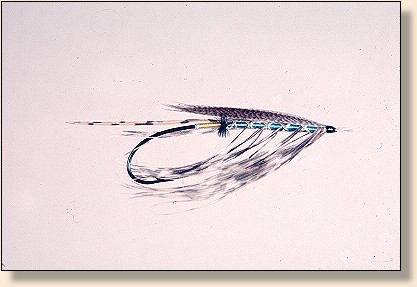
10. The finished fly.
Here are more flies tied the same method.

Radical Dude

Silent Killer

Highlander, Orange

Orange Crush
Bottom Dweller
As always, I am happy to answer any questions you might have about these patterns. You can reach me at Ronn or 503-654-0466.
Happy Trails! ~ Ronn Lucas, Sr.