
The Rusty Rat
The Rusty Rat is one of a series of tried and true patterns and is the most popular of the bunch.
The Rats were originated in 1911 by Roy Angus Thompson and, his initials R. A. T. are the inspiration for the name of the patterns. In the book, Flies for Atlantic Salmon by Stewart & Allen, they give some of the history of these handsome flies and show several of the other variations of the series. Not all of the RAT’s were of Mr. Thompson’s origin but, his patterns inspired the others so, the RAT initials have followed the various patterns.
Suffice it to say that a good number of fish have fallen to these flies through the intervening years.
I choose to start this series with the Rusty Rat to introduce Tyers to what may be new techniques and disciplines to some. With this fly we will learn my method for attaching and applying the tinsel tag and how to apply floss and ribbing. These techniques will apply to most of the patterns the Tyer might tie be they simple flies such as the Rats or, the complex fully dressed flies.
Tag: Oval gold UNI-Tinsel.
Tail: A few Peacock sword herl.
Body: Rear half, Orange-Yellow Floss (UNI-Floss rust orange), veiled above by one strand of same floss extending to the middle of the tail, Front half, Peacock herl.
Rib: Oval gold UNI-Tinsel.
Wing: Grey Fox guard hairs.
Collar: Soft grizzly hackle.
Cheeks: Jungle Cock (optional).
Head: Red.
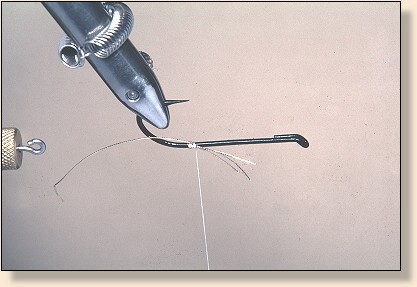
Tag applied and rib attached.
1. Tie in the tinsel tag and attach the rib on the back side of the fly with the waste end below the other two strands and the working end at the bottom of the hook just slightly to the rear of the center. When the rib is turned forward, it will come forward slightly. The intent is to have the first turn begin at the bottom of the fly and the last turn at the top. (For step-by-step instructions with photos of the tag see Tying the Tag.)
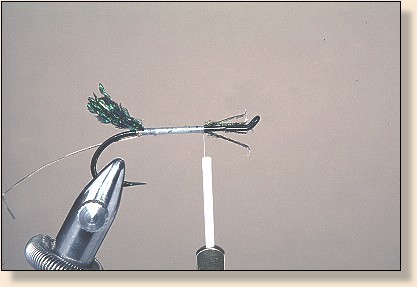
Tail tied in and thread advanced.
2.Tie in the Peacock sword herl (5 or 6) on the top of the hook and, advance the thread in flat wraps to the point where the floss part of the body ends.

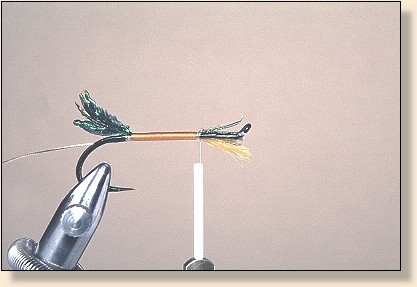
Floss tied in and flattened.
3.Tie in the floss on the front of the fly and flatten it by untwisting slightly. As noted in the tag introduction, I recommend UNI-Floss because it is strong and bright. It is also a single strand floss which makes wrapping a smooth floss body easier than a multi strand floss.
Note: Floss can be difficult to use for a variety of reasons, not the least of which is how it tends to flair out when it is being applied. When the floss has been tied in, flatten it by untwisting as shown and, while maintaining constant tension, stroke the floss to align all the filaments all the way to the other end (you have sanded your thumb and index fingers and washed your hands by now haven’t you!). The further away from the hook while you wrap the floss, the more it will try to splay out. So, holding the floss as close as conveniently possible, take a turn or two. As soon, or if a filament goes out of place such as making a small bump or loop, again stroke the filaments to the other end. You want to keep the filaments parallel at all times. Again, do not let up the tension. If you do, the floss will become a nightmare and, unusable at worst. When you get to the butt or the area where you change directions or want to end the floss, make sure you do not build up any extra bulk with extra or unneeded turns. Do not wrap the floss too loose or, too tight. Only practice will help you learn what these parameters are. If you are tying on a in line rotary vise, get used to applying floss with the rotary function of the vise. Floss is tough to do well so, practice it and don’t let yourself be frustrated. Remember what works and repeat that. Remember what doesn’t work and don’t repeat that. Keep focused during your tying and, you will be fine.

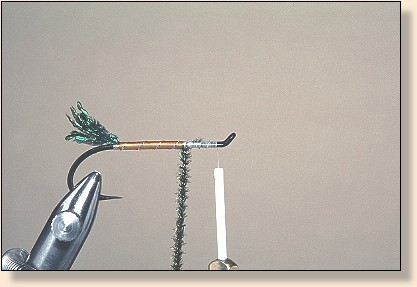
Floss applied.
4.Wrap the floss in fairly tight turns side by side to the rear of the body and back forward while trying to keep it as flat and smooth as possible. The highlight area on the floss will tell you how flat it is. The straighter the line, the flatter. This photo shows the finished floss. You will note a few wavy areas in the highlight. This can be smoothed somewhat with a burnisher (see the tools section) and/or smooth faced pliers. Especially with the pliers, care must be exercised so none of the floss filaments will be broken. It is very frustrating to have an otherwise great looking floss body with one or two frayed filaments hanging off one side.
Floss flattened with pliers.
5.This photo shows the same floss after some burnishing. It’s not perfect but is a little better and, I believe, worth the effort.

Rib applied in four even turns.
6.Wrap the rib in four even turns ending on top of the hook at the end of the floss. You can now cut all the waste ends of the previous materials.

Three herl attached and thread loop.
7.Tie in three or four herl and form a thread loop.
Herl and thread twisted.
8.Twist the herl and thread to form a rope like affair. This will strengthen the herl.

Herl applied.
9.Wrap the herl forward, tie off and trim. Stay back from the eye of the hook. Leave enough room for the wing, hackle and head without crowding the eye.

Floss underwing applied.
10. Tie in the strand of floss for the underwing. You can either tie this part in before the herl or after, as I have done.

Wing applied.
11. Select a bunch of Grey Fox guard hairs. Remove the underfur and, tie in with very tight turns of thread. Try to get into the habit of flattening your tying thread when tying these flies. When you get to the display flies, every turn of thread means more bulk and, extra bulk ain’t always pretty. You can put a little head cement on the butts of the wing at this point.

Hackle prepared.
12. Select a soft grizzly feather for a hackle. Cut the shaft and the bottom couple barbs as shown. The stubs of the barbs will help hold the end in place.

Hackle tied in.
13. Tie the feather on the rear side with the convex side to you.

Hackle applied and head finished.
14. Wrap the hackle forward while stroking the fibers rearward, tie off and trim. Put a couple half hitches in and cut the working thread off. Replace with the fluorescent red thread and form the head.
As always, I am happy to answer any questions you might have about these patterns. You can reach me at Ronn or 503-654-0466.
Happy Trails! ~ Ronn Lucas, Sr.